


No matter how much you clean, it’s hard to say your home is truly tidy if you don’t spend time on the walls. We don’t always recognize it, but they’re often the first to fall victim to the assorted spills, splatters, stains, and scuff marks that appear during the daily activity in a busy household. Walls literally tie the room together, making their regular upkeep essential in a healthy and happy home.
Cleaning walls doesn’t require much effort, especially if you follow the proper routine and techniques. In many cases, you can keep walls clean easily with regular dusting and mild cleaning solutions. We’ll explain how you can make your space look its absolute best in no time with these tips and insights into how to clean walls in the home.
How to Clean Walls Around the Home
Dusting with a vacuum cleaner or microfiber cloth at least 1–2 times monthly is a simple way to clean walls. Spot-clean wall stains and scuffs with rubbing alcohol or a solution of mild dish soap in warm water. Wash the walls annually, and perform touch-ups to restore their appearance.
When you sweep them frequently and make an intensive wall cleaning part of the spring cleaning checklist, upkeep will be effortless. But you’ll want to adjust your specific approach depending on the wall type and cleanliness level to make the job as quick and easy as possible. Let’s look at the best ways to clean the flat surfaces around your home.
Step 1: Determine the Wall Type
Not all walls will use the same cleaning solutions. In general, a light cleaner of mild soap and warm water will suffice for most surfaces. But coarse materials like brick and some types of wood paneling will need different cleaning tools than smooth surfaces, and not all materials can tolerate similar cleaning solutions for tough stains.
Step 2: Prepare the Room
Whether you’re doing your monthly dusting or your annual deep clean, remove wall hangings, pictures, and decor before working. It’s a perfect time to clean these easy-to-reach items anyway, and you’ll save tons of time by not having to work around them as you clean your dirty walls.
Step 3: Sweep and Dust the Wall
Regularly dusting the walls is easy and practical. By removing dirt and dust, you’ll protect the home against allergens while refreshing the room’s looks. Dust the walls at least once every 2–4 weeks during your weekly cleaning chores.
How to Dust Walls
Starting from the top and working to the floor, dust the walls with a microfiber cloth or long-handled duster that can reach the ceiling. Dry microfiber cloths are best for smooth painted walls, as their static charge attracts and holds dust.
Use a vacuum cleaner with a soft brush attachment or a bristle broom for textured walls, such as brick and masonry.
Tip: Try a dusting sheet like the 3M Easy Trap Sweep and Dust Sheets if you have multiple types of surfaces to clean or high walls. They work on numerous surfaces without losing performance and easily attach to a long-handled sweeper for convenient high-up cleaning.
Step 4: Clean the Walls
Mix a few drops of dish soap in two cups of warm water in a large bowl. Dip a clean cloth in the cleaning solution, and wring well until it’s slightly damp.
Wipe down the wall, ensuring you don’t allow drips or fleck marks from staining when they dry. Rinse any remaining soapy residue from the wall, and let it air dry.
Painted Walls
Latex-painted walls are some of the most common wall types in modern homes, where they feature prominently in just about every room. As an interior paint, latex paint is easy to apply and resistant to cracking and fading, making it the preferred choice for DIYers.
Oil-based painted walls are less common. They’re practical in high-moisture areas, such as bathrooms and kitchens. These paints are more tolerant of harsh cleaners. That’s why they’re ideal for places that might suffer more abuse. Interior door trim is often subject to stains and scuffs from people banging into and touching them, while fixtures like cabinets constantly have greasy hands on them, making them excellent places to use oil-based paint.
In terms of cleaning painted walls as part of a routine, you’re usually splitting hairs in determining whether your wall has oil-based or latex paint. Lightly soapy water is often safe and powerful enough to clean walls painted with any product.
Cleaning Supplies
- Dry microfiber cloths
- Warm water
- Dishwashing soap
- Cleaning cloth or sponge
How to Clean Painted Walls
- Dust the wall from the top down with a microfiber cloth or long-handled duster
- Mix warm water with a few drops of dish soap in a bowl
- Dip a clean cloth or sponge in the soapy water, and wring well until lightly damp
- Wash the walls with the damp cloth by gently rubbing in a circular motion, starting at the top and working down the wall
- Rewet the cloth as needed as you work
- Gently rub away scuffs and marks around common touchpoints, like light switches and door trim
Tip: Make a thick baking soda paste with water for tough stains that won’t come out with your soapy cleaning solution. Apply the paste to the stain, and use your damp sponge or cloth to buff it into the wall.
Wood Paneling
Finished paneling is smooth, easy to wipe down, and tolerant of many cleaning solutions. It’s less likely to hold dirt and will often look like new with little more than a quick dusting with a microfiber cloth. In many cases, you can clean it as you would a finished hardwood or engineered floor, starting with sweeping and finishing with a wipedown with a damp cloth.
Unfinished wood paneling takes extra care, as the porous surface can absorb moisture, grow mold, and warp. Instead of cleaning walls with a simple soap and water cleaner, applying an oil finish will help seal and restore the wood while keeping its natural appeal.
Cleaning Supplies
- Vacuum cleaner with a soft brush attachment
- Clean cloths or sponge
- Water
- Dish liquid
- Distilled white vinegar
- Mineral oil
How to Clean Walls with Wood Paneling
- Vacuum the wall with a soft bristle brush attachment to dislodge and remove dirt and dust (a dry microfiber cloth works on smooth finished wood)
- Finished wood: Mix a few drops of dish soap in warm water in a spray bottle
- Unfinished wood: Mix ½ cup mineral oil, ¼ vinegar, and one cup water in a spray bottle
- Spray a clean cloth with your cleaning solution until only slightly damp
- Wipe down the walls, moving with the grain and respraying the cloth as needed
- Dry the walls with a clean cloth to remove any lingering moisture
Brick
As a porous surface, brick will quickly grab dirt and take on an overall dingy appearance. But it’s also durable. Although you’ll have to use something with more scrubbing power than the average microfiber cloth to dislodge dug-in dust and grime, brick can handle a little extra force.
Clean larger brick walls in 20-square-foot sections. While brick is stout, the BIA’s recommendations still include spot-testing cleaners, using mild solutions, and avoiding abrasive tools like wire brushes.
Always saturate the brick with water before applying any cleaning agent. By letting the brick absorb water, the cleaners will stay on the surface and be easier to remove. Unique wall stains may need specific treatments, but general wall cleaning only requires basic household detergents.
Cleaning Supplies
- Vacuum with a brush attachment
- Nylon brush
- Spray bottles
- Water
- Mild dishwashing liquid
- Microfiber cloth
How to Clean Brick Walls
- Vacuum the wall thoroughly with a soft bristle brush attachment
- Lay towels at the base of the wall to catch drips
- Fill a spray bottle with plain water and saturate the brick thoroughly before cleaning
- Mix two cups of hot water with two tablespoons of mild dish liquid in a bowl
- Dip a nylon scrub brush in the soapy water, and scrub the brick in a circular motion to work out any wall stains
- Rinse the wall with fresh water
Brick Wall Cleaning Alternatives: Brick is prone to irritating oil and dirt stains because of its texture and absorbency. If your regular soap and water cleaning solution isn’t doing the trick, try one of these brick-safe cleaning upgrades for tough marks:
- Mix dish soap and salt into a poultice, leave on the stain for 10 minutes, and scrub away with a brush before rinsing
- Make a thick paste with a couple of drops of dish soap, baking soda, and water to use as a poultice, and scrub with a nylon brush
- Spray Scrubbing Bubbles on the brick and let sit for 10–15 minutes before scrubbing and rinsing
- Add ¼ cup of household ammonia to your dish soap and water cleaning solution
Concrete
Concrete basement walls are easy to clean but also easy to damage with certain everyday cleaners. Extremely strong alkalis and acids can deteriorate concrete, affecting its natural alkalinity and the mineral content in the cement. Acidic cleaners like vinegar can gradually eat away at polished concrete surfaces, etching unsightly blemishes that are particularly challenging to correct.
Although it’s unlikely that your all-purpose vinegar cleaner will be strong enough to damage concrete, it’s best to take safer approaches with diluted alkaline cleaners and mild soap.
Cleaning Supplies
- Vacuum cleaner with a brush attachment
- Dry microfiber cloths
- Nylon brush
- Mild dish soap
- Water
- Clean cloth or sponge
- Wet mop (optional)
How to Clean Concrete Walls
- Dust the wall with a microfiber cloth, or vacuum with a soft brush attachment if the wall has texture
- Mix two tablespoons of dish soap in two cups of warm water
- Dip a clean cloth or sponge in the cleaning solution, and wring until it isn’t dripping
- Wipe down the wall with the damp sponge or cloth, rewetting as needed (use a wet mop for tall concrete walls or large areas)
- Rinse the wall with plain water
- Towel dry any lingering moisture, and open windows to let the rest air dry
Fighting Tough Stains on Concrete: For unpolished concrete, ammonia or bleach diluted in water in a 1:16 ratio can remove stubborn stains and mold buildup, a common occurrence in a damp basement. Do NOT use ammonia and bleach together, as they form a highly dangerous combination. Take necessary precautions when working with harsher cleaners, including wearing rubber gloves and airing out the space.
Tile
Cleaning walls with tile entails many of the same considerations as concrete. Tile is tough, and its smooth surface makes it effortless to wipe clean. At the same time, certain DIY cleaners can degrade the grout. Use mild soap with water to protect the tile and keep your bathroom and kitchen walls looking their best.
Cleaning Supplies
- Dry microfiber cloths
- Vacuum with a brush attachment
- Mild dish soap
- Water
- Clean cloth or sponge
- Towels
How to Clean Tile Walls
- Wipe away dust and dirt with a dry microfiber cloth (use a vacuum with a soft brush attachment for coarse sanded grout)
- Put down towels before washing walls to catch drips
- Mix two tablespoons of dish liquid with two cups of warm water in a bowl
- Dampen a clean cloth or sponge in the cleaning solution
- Wipe down the tile walls, adding a little extra elbow grease to remove stains
- Use a soft-bristled nylon brush or old toothbrush to scrub tough stains in the grout
- Rinse the wall with plain water
- Towel dry excess water from the wall
Gentle Grout Cleaning: Gently scrub stains from grout with a baking soda and water paste. Alternatively, you can make a similar paste with baking soda and hydrogen peroxide. Check out our article for removing tough mold stains from grout for more information on deep cleaning a tile wall.
How Do You Clean Indoor Walls?
Soap and water will clean most everyday stains and splatter on walls, such as spilled food or kicked-up dirt. But in a house with kids, pets, and clumsy adults, marks on the wall can come from anywhere.
For tough wall stains, try a Magic Eraser. Melamine sponges work on numerous hard surfaces to buff out almost any mark. Avoid applying too much pressure, especially on latex paint, because the light abrasiveness can gently sand the top layer.
Here are some cleaning tips for getting rid of common wall stains:
Scuffs
Scuffs are one of the most common marks on walls, and they don’t always come out with your soapy cleaning solution. For these, dampen a cloth or paper towel with rubbing alcohol, and buff the stain out.
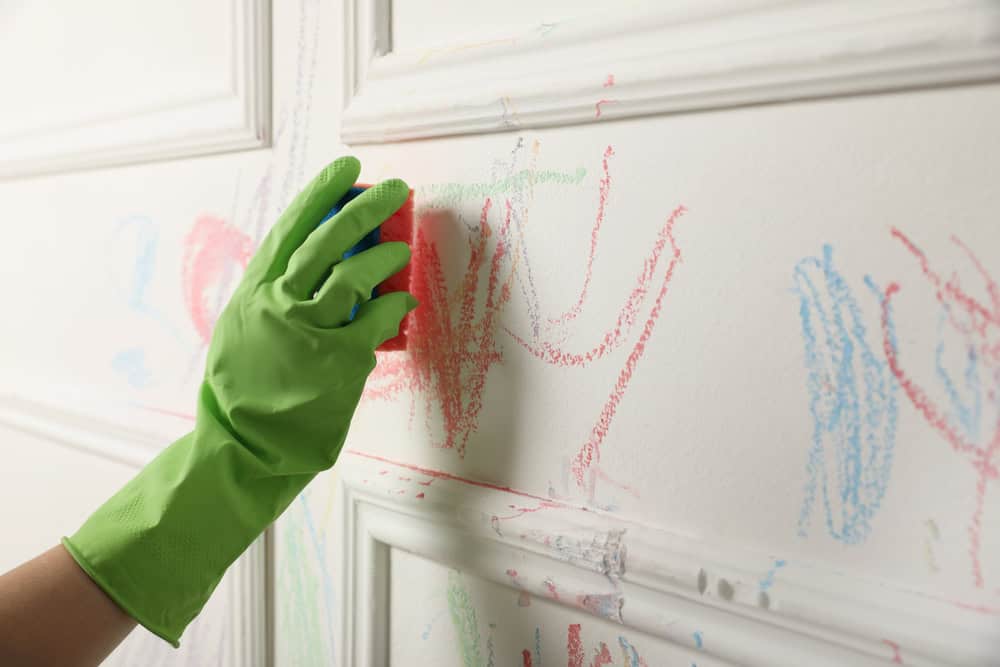
Crayon
White non-gel toothpaste is the best tool for cleaning small patches of your child’s crayon art from painted walls. Apply a small amount to a paper towel and gently rub it into the mark. Check out our article on removing crayon and pencil from walls for other effective cleaning options.
Ink and Marker
Rubbing alcohol and other solvents is the best solution for permanent marker and ink stains on the wall. Apply some alcohol to a clean cloth, and rub the mark away.
How Do You Clean Walls Without Damaging Paint?
The soapy water solution described here is the best way to get your painted walls clean. It’s easy to whip up, effective on light dirt and grime, and safe for an oil-based or latex paint finish. If you have challenging stains and need more help with your painted wall, check out our article on cleaning walls without ruining the paint.
Can You Use a Wet Swiffer on Walls?
You can quickly clean smooth-surfaced walls with a wet Swiffer mop. It can touch hard-to-reach spots on the wall and slides easily along the corners. The primary downside is that fresh Swiffer pads can leave drips, which can leave marks and get behind outlets and light switches.
What Is the Best Thing to Wash Walls With?
Washing walls with mild dish liquid and water is generally safe and effective. You’ll need to use either a microfiber cloth for smooth surfaces or a scrubbing brush to reach into the nooks and crannies of a textured wall. More challenging cleanups, such as soot stains, will need more powerful degreasers and specialty cleaners, but soapy water will handle most of the blemishes you’ll encounter with regular cleaning.