


Despite being the biggest surface in any room, walls rarely get the care they need when cleaning time rolls around. Dust, dirt, and stains appear on walls as much as on any counter or other flat surface. Add them to your deep cleaning checklist, and the difference it will make in the health, comfort, and look of your home could amaze you.
Yet cleaning painted walls without a plan may be worse than not cleaning them at all. The wrong methods will too often dull and abrade paint, leaving loads of damage and an even more challenging chore on your hands. We’ll help you ensure a pristine polished look from top to bottom with this breakdown of how to clean walls without damaging paint.
How to Clean Walls Without Removing Paint
Many of the same tools and techniques will work to clean painted walls of any kind. In general, you’ll need a vacuum cleaner with a brush attachment, a microfiber cloth, a sponge, and water. Then, all you have to do is determine the wall’s paint type to guide your approach.
We have picked out a helpful video for you on the basics of cleaning painted walls.
1. Remove Dust and Sweep Before Cleaning
Supplies
- Microfiber cloth
- Vacuum with a brush attachment
- Broom (optional)
Directions
Start cleaning your dirty walls by removing the initial dust and grime layers with a dry tool, preferably a dry microfiber cloth. Wipe down the walls from top to bottom. Don’t forget to wipe across the top of any window or door trim where dust accumulates in abundance.
Alternatively, you can use a vacuum cleaner with a brush attachment for easy wall cleaning. A vacuum with an extended wand is ideal for tricky, high-up wall corners. If you don’t have a vacuum handy, a broom works equally well for out-of-reach dust clumps and cobwebs.
2. Make a DIY All-Purpose Cleaner
Supplies
- 1 cup warm water
- 1–2 drops of dish soap
Directions
Mix the ingredients in a bowl. You can use this cleaning solution for any painted wall, but the finish will determine the best way to apply it.
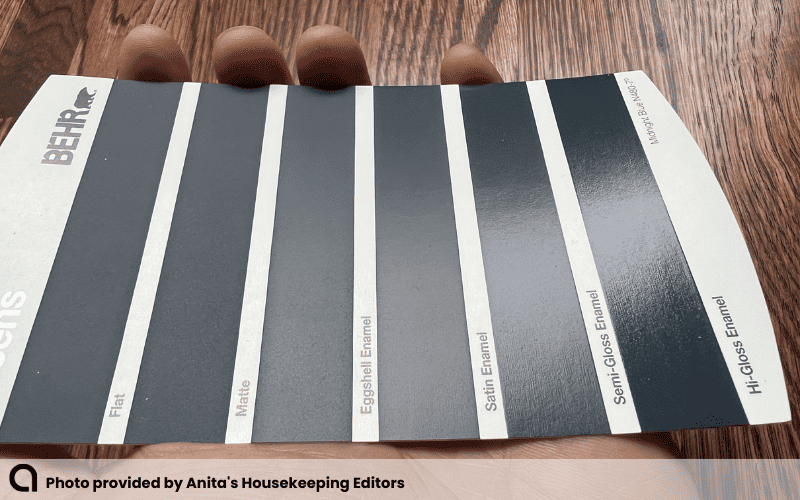
A paint’s finish defines its light reflectivity and, to a degree, its durability. The glossiness depends on the paint’s pigment volume concentration (PVC), the ratio of binder to pigment.
Paint types with more resin and less pigment are glossier. They typically have much higher durability against scrubbing and stains. Although this solution will clean walls painted in any finish, the PVC does affect porosity, meaning you’ll need a gentler touch on matte and eggshell than on glossy finishes.
Not sure how to tell if your wall’s finish in flat, satin, glossy, etc.? One of our editors took a picture of this handy tool by Behr for your reference:
3. Cleaning Flat Finishes
With a higher PVC, flatter finishes absorb light and hide imperfections well. Matte finishes are generally best for bed rooms, living rooms, and low-traffic areas; whereas, glossier eggshell and satin finishes are generally best for mud rooms, hallways, and high-traffic areas.
Although matte paints are typically more challenging to clean than glossy paints, newer products are more wear-resistant and versatile. Still, a gentle approach is always better. The more pigment-heavy finishes can degrade more readily from harsh chemicals and excessive moisture.
Step 1: Dampen a Soft Sponge or Clean Cloth
Dip a non-abrasive clean sponge or cloth into your cleaning solution. You can also try water alone if your walls only need a light cleaning. Thoroughly wring out excess water, as you’ll want only a slightly damp cloth or sponge to prevent damage.
The key here is to thoroughly wring out excess water, so that the sponge or cloth is slightly damp.
Step 2: Wipe Down the Wall
Wipe down the wall, starting from the top and working to the bottom. Re-soak and wring out your sponge as needed. Do not apply too much pressure or scrub because it could lift some paint.
Step 3: Dry the Wall
You can wipe down the wall with a dry microfiber cloth. With such little water touching the walls, you may be able to skip this step and instead open the windows or turn on a fan to air dry them.
4. Cleaning Semi-Gloss and Glossy Finishes
Lower PVC paints, such as glossy and high-gloss, have more binder, allowing for a smooth, stain-resistant surface. Kitchen walls, hallways, and high-traffic areas benefit from improved damage tolerance. Scuff marks and tough stains generally wipe clean without effort or risk of ruining the paint.
Step 1: Dampen a Sponge or Cloth
With your water and dish detergent solution, use a damp microfiber cloth or sponge to clean glossy wall finishes. There’s less chance of drips damaging the smoother paint job, so you can use a little extra cleaner if desired.
Step 2: Wipe Down the Walls
Clean the walls from top to bottom with a damp sponge. Keep drips from running into outlets and light switches.
Tip: For more challenging dirty walls or to prep walls before painting, use a mild degreaser. Glossy walls have a durable seal that can handle stronger all-purpose cleaners. A solution like Simple Green works well on sealed oil and latex-painted walls.
Step 3: Dry the Walls
Run a dry cloth over the walls to dry up any remaining cleaner. You can rinse the walls beforehand with plain water if there is leftover soap residue, though this is usually unnecessary.
5. Cleaning By Paint Type: Oil or Water-Based Paint?
Cleaning walls with a mild DIY solution is safe regardless of the type of paint, whether oil-based or latex. Oil-based painted walls are much less common. Latex paint, which is water-based, is cheaper, easier to use, and presents fewer hazardous VOCs that could contribute to long-term health disorders.
The downside to water-based paints is that they don’t hold up to abrasion or chemicals like oil-based paints do. While many advise using more powerful cleaners like Borax on oil-based paints, harsher detergents can damage latex.
Spot-Test Cleaners
If you’re unsure whether your wall has an oil-based or latex paint coat, always spot-test any new cleaner. Test the cleaner on a low, hidden area, letting it dry to see if it changes the wall color.
Tip: Find out if your wall has oil-based or latex paint by rubbing a small patch with a cotton ball dipped in acetone. Acetone softens and wipes away latex paint but has no effect on oil-based paint. Though useful in some cleaning situations, testing the paint type is usually only necessary if you plan to repaint.
6. How to Clean Stubborn Wall Stains
- Start washing the painted wall with a soft sponge or clean cloth dipped in a DIY cleaner of warm water and mild dish soap
- Try spot-cleaning stains with a baking soda and water paste
- Gently rub stubborn scuffs and stains away with rubbing alcohol
Baking Soda
Baking soda is one of the most versatile DIY cleaners. The mild abrasiveness and stain-lifting ability are strong enough to remove grime but gentle enough to prevent discoloring your wall. It’s a convenient first choice for stuck-on gunk or a tricky grease stain.
Spot clean stains with a thick paste using baking soda and a little water. Alternatively, you can sprinkle baking soda directly on a dampened sponge.
Rubbing Alcohol
Rubbing alcohol is an excellent general solution to clean wall stains. Make it your go-to for challenging scuffs, pen marks, or marks from permanent markers on the wall. Dampen a clean cloth with a few squirts of rubbing alcohol and buff marks away.
Toothpaste
Toothpaste is your secret weapon when the kids get too enthusiastic with the crayons and pencils. Apply a dab of white, non-gel toothpaste to a cleaning cloth, and buff it into the mark. The abrasive crystals will make it disappear. Wipe away any toothpaste residue with a damp sponge.
Magic Eraser
When all else fails (or you want to take a shortcut), pull out the Magic Eraser sponge to remove scuffs and nearly any other wall stain. They can get runny, so you’ll have to be wary of drips as you work to prevent staining once it dries. A light touch is essential. These melamine sponges are like super-fine sandpaper and can damage some painted walls if you use too much force.
7. Keep Walls Clean
Cleaning walls is exponentially easier when you make it part of the cleaning routine. Immediately clean spills, scuffs, and all other unintentional and accidental stains as soon as they occur. At a minimum, clean high-touch areas, such as light switches and around them, once a week. Dust and clean the walls monthly. When spring cleaning rolls around, touch up or repaint walls as needed.
Mistakes to Avoid
- Using harsh cleaners. Avoid using ammonia, bleach, highly alkaline detergents, and other abrasive cleaners that may damage the paint
- Scrubbing with force. Even water on a sponge can remove paint if you press it into the wall too hard. Err on the side of caution
- Using too much water. Use cleaners and water with restraint, especially on matte walls, because drips and other water stains will stick out after drying
- Cleaning with dyed sponges or cloths. Use only white cloths and un-dyed sponges to prevent color transfer to the walls
- Using abrasive scrubbers. Avoid scratching and dulling paint by using soft sponges and non-abrasive scrubbers
- Cleaning before dusting. Running a damp cleaning cloth over dusty walls will often smear and worsen grime and stains, making cleanup more difficult
What Is the Safest Way to Clean Painted Walls?
Warm water, mild dish detergent, a soft cloth, and an even softer touch can clean your walls without removing paint. Dusting beforehand is essential. Spot-test any new cleaner if you’re unsure how the paint will respond.
What Is the Best Thing to Wash Walls With?
A mild warm water and dish liquid solution is the best way to clean a wall. Dish soap is versatile enough to handle everything from grease marks to soot stains while still being gentle on all paint types. If you don’t have dish liquid, a vinegar and water cleaning solution can also be effective for lightly dirty walls.
Does Cleaning Walls Ruin Paint?
With frequent cleaning and fast response to damage, you won’t ruin your paint while cleaning. Manufacturers are constantly making their paint products more durable and easy to clean. Whether you have an oil-based paint or latex paint, a water and soap solution or even an all-purpose white vinegar cleaner can effectively and safely clean walls without harming them.
How Do You Clean Walls Without Damaging Flat Paint?
Matte and eggshell-painted walls are easy to clean if you follow the simple rule of applying a light touch with a slightly damp cloth or sponge. These paints lift easily with too much pressure. Gently rub a non-abrasive cleaning solution in a circular motion into stubborn stains, and you should see them eventually lift away. Cleaning your walls regularly can prevent stains from becoming overly challenging to remove.
Can I Use a Magic Eraser on Flat Paint?
Interestingly, Magic Erasers are often kinder to a matte surface than to a glossy paint finish. Because they work partially by scrubbing away stains, melamine sponges can damage a paint coat. While flat paints cover up minor flaws to a degree, the rubbed area will stick out on a glossy surface, especially when the light catches it just right.