
Pristine window sills rarely get enough credit. It’s bad enough that they’re dust and smudge magnets, but incoming sunlight can also make dirty window sills stick out like a sore thumb.
I know the nooks and crannies can make them a pain to manage. But if your home is ready for a next-level deep clean, I’ll explain my favorite ways to keep window sills and tracks looking as fresh as ever.
How To Clean Window Sills
Clean your window sills (or at least dust them) every 1–2 weeks before sweeping or vacuuming the floor. Frequent wipedowns will keep dirt from accumulating and creating a more challenging cleanup. At the same time, a healthy cleaning habit will help you identify issues with weatherstripping and caulking around the window, critical factors in air sealing your home to make it more energy efficient.
Window Sill Cleaning Tools and Supplies
- Clean cloths
- Dish soap
- Warm water
- Spray bottle (optional)
- Stiff-bristle brush
- Cleaning toothbrush
- Dryer sheets (optional)
Step 1: Wipe the Window Sill With a Dry Cloth
Use a mini whisk broom to sweep away dirt, dead bugs, and other loose debris. Don’t skip this step if your window sill is significantly dirty. When you use your wet cleaning solution on an overly dirty window, you risk spreading the dirt around and making the chore take longer.
Step 2: Clean the Window Sill With a Soapy Cleaning Solution
Mix a few drops of dish soap with a cup of warm water in a bowl or spray bottle. Saturate a clean microfiber cloth in the solution, and wring out excess water until it isn’t dripping. Wipe the window sill with a damp cloth to clean away dug-in dirt and grime.
Step 3: Scrub the Corners and Tough Stains With a Brush
Use an old toothbrush to scrub the tight corners where the window sill meets the window and trim. If you have stubborn grunge on the sill, spray it with your cleaning solution, and use a stiff scrub brush and some elbow grease to work it out.
Tip! Use baking soda to clean windowsills if you don’t have a scrub brush. Sprinkle a small amount on the stain and rub it with a clean cloth. The micro abrasive action will remove stubborn marks without scratching the window sill.
Step 4: Wipe and Dry the Window Sill
Use a damp microfiber cloth to wipe away the cleaning solution. Finish by drying with a clean microfiber cloth or paper towel.
Step 5 (Optional): Wipe With a Dryer Sheet
Like cleaning baseboards, you can finish your window sills by wiping them with a dryer sheet. The sheet deposits its fabric softener on the surface to reduce static and repel dust. It won’t make it impervious to dust accumulation but will slow the buildup and hopefully give you more time between cleanings. You can also use a dryer sheet to dust your window sills if they don’t need a deeper cleaning.
How To Clean Stubborn Stains on Window Sills
Cleaning window sills is the most straightforward with a Magic Eraser. Get the sponge wet, squeeze excess water out, and gently scrub away any embedded dirt and stains.
Melamine sponges also make an excellent cleaning tool for window trim. If I have any juice left in my Magic Eraser after tackling the window sills, I’ll usually take care of any smudges or dirt build up around the frame.
Magic Erasers are one of the most convenient options for freshening window sills. But they also leave room for damage. Since melamine sponges work through mechanical action, they may scratch the sill or damage the paint when you apply too much pressure. If you’re uncertain about using them, gently scrub a test patch before using a Magic Eraser over the entire surface.
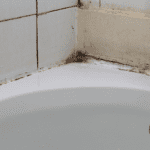
How To Handle Mold on Window Sills
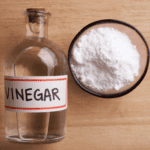
Mold from outside can settle on the window sill, making cleaning crucial to protect the look of your windows and avoid health issues from breathing in mold spores. If you notice small patches of mold developing, you can clean your window sill with bleach water (1:16 chlorine bleach to water) or undiluted white vinegar. Spray the cleaner on any mold spots and scrub them with a stiff brush.
How To Clean Window Tracks
Because of the tight nooks and crannies along the sides of the windows, your success in cleaning window tracks comes down to the proper tools.
In my experience, nothing beats my handheld steamer, a Bissell Steam Shot, for cleaning my double-hung window tracks. The steam lifts grime and blasts buildup out of cracks that a brush would have trouble reaching. After steaming, you can wipe the loosened dirt away with a clean cloth.
If you don’t have a steam cleaner, you can still clean window tracks like a pro with a small cleaning brush set and a vacuum cleaner. Although a dedicated brush set will likely give you the best results with the least effort, you can also use old toothbrushes, bottlebrushes, or artist paintbrushes if they’re all you have handy.
Window Track Cleaning Tools and Supplies
- Cleaning brushes
- Shop vac
- Dish soap
- Spray bottle
- Clean cloths
- Cotton swabs
Step 1: Brush Away Dry Debris and Vacuum
Use a dry brush to scrub as much dirt, sludge, and debris from your window tracks as possible. Vacuum the loosened dirt with the crevice tool.
Step 2: Apply a Wet Spray Cleaner
Mix a few drops of dish soap with a cup of warm water in a spray bottle. Spray any troublesome grime or dirt spots your dry brush couldn’t lift, and let the solution sit for a few minutes to loosen it.
Step 3: Scrub the Tracks
Scrub the window tracks with your cleaning brush to remove any remaining dirt.
Step 4: Rinse and Dry
Wipe the tracks with a damp microfiber cloth to remove the loosened dirt and soap residue. Finish by drying with a clean cloth or paper towel. Use a cotton swab to grab the dirt around the tricky corners behind the lips on the side of the window tracks.