


Many household chores seem like they don’t make much of a difference in the long term, but cleaning the dryer lint trap is one easy task that can literally save your life. Excess lint will hamper your dryer’s performance, but an overabundance also adds a significant fire hazard to the laundry room.
Dryers cause over 13,000 residential fires annually, a third of which result from poor lint-cleaning habits. Considering the consequences, your lint screen should be a top priority on the chore checklist.
Though simple, it often entails a deeper cleaning than many people realize. Let’s explore how to clean your dryer lint trap to keep your machine working efficiently and safely.
How to Clean a Dryer Lint Trap
You should clean the dryer’s lint trap every time you dry a load. The simple habit only takes a few seconds, and you can always be sure your clothes will dry as quickly and thoroughly as possible.
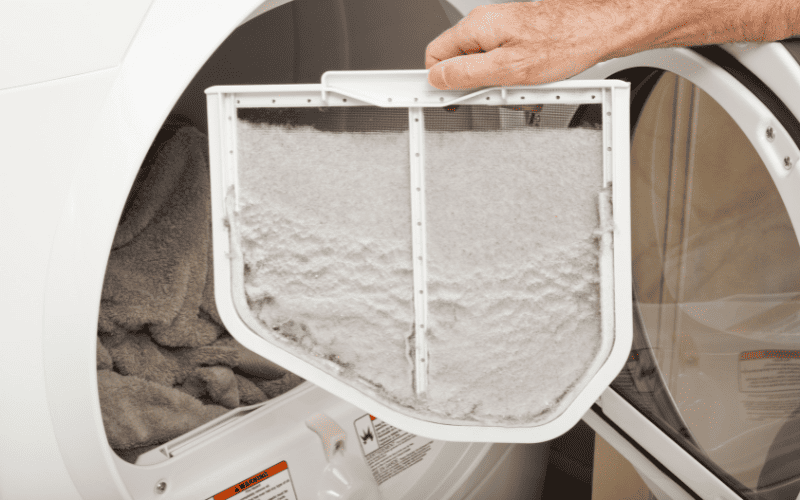
Step 1: Clean the Dryer Lint Screen
With the dryer unloaded, remove the lint trap. The trap is either on the machine’s top or inside the dryer door in front of the drum. Remove the lint from the screen by raking your fingers along it to peel it away.
Step 2: Vacuum the Dryer Lint Trap Slot
After cleaning the lint trap screen, you may need to remove excess lint from the slot. If the screen doesn’t slide back into the pocket completely, a buildup is likely blocking it.
You can try cleaning out the lint trap opening with your vacuum cleaner and crevice attachment. But in my experience, the crevice tool usually can’t reach far enough to extract the bulk of the loose lint. The slot’s interior slopes towards the fan and the opening is too narrow for the attachment to reach the clumps at the bottom.
To make life easier, here are a few tools you can use to remove lint from those hard-to-reach places:
- Knife or silicone spatula with a microfiber cloth wrapped around the head
- Swiffer Duster
- Dryer vent vacuum attachment (here’s one from Holikme)
If you don’t have a workable implement, you can use a Phillips-head screwdriver to disassemble the plastic housing and slot assembly, giving you a larger opening. It’s more work, but you can push the crevice tool further into the machine.
Step 3: Check Residue Buildup on the Lint Screen
A gunky film can develop on a lint screen over time as it traps fabric softener and liquid detergent residue from clothes. While it accumulates, the residue impedes the dryer’s airflow and reduces the drying efficiency, wasting time and electricity.
Deep cleaning the lint trap isn’t necessary every time you do laundry. If you use fabric softener or dryer sheets, checking for residue and cleaning the screen every few weeks will optimize your dryer’s performance. To inspect the lint screen, hold it to the light and see whether the pores are clogged.
Step 4: Remove Lint Screen Residue
To remove residue from the lint filter, add a few drops of liquid detergent or mild dish soap to a bowl of hot water. Dip a nylon brush in the soapy water, and scrub the screen. Rinse with hot water and towel dry thoroughly.
Step 5: Clean the Moisture Sensor
When your lint trap clogs with residue, there’s a good chance your moisture sensors are also dirty. Moisture sensors are two parallel metal bars sitting near the lint filter. As they develop a residue layer, the sensors can’t accurately assess the moisture level in the clothes. Cycles will often be too short, causing laundry to come out damp.
Clean the moisture sensors with a soft cloth dipped in soapy water. Ensure the cloth is only slightly damp. Wipe down the sensors, and dry them with a clean towel.
Step 6: Clean the Dryer Duct as Needed
You’ll only need to clean dryer vent tubes and ducting a few times annually. The appropriate cleaning frequency can vary depending on how often you do laundry, the length and direction of your ductwork, and what fabric softener you use.
You can also hire a professional dryer vent cleaner, running roughly $100–$150. Vent cleaning is not a typical house cleaner job, so you must hire a separate company if you use a weekly maid service.
How Can You Tell if Your Dryer Vent is Clogged?
Cleaning a dryer lint screen is essential to proper dryer maintenance, but it isn’t always enough to make your machine work like new. Some signs that your dryer vent and ductwork need a deep cleaning include:
- Clothes are taking an excessive amount of time to dry
- The dryer drum develops condensation when off
- The dryer isn’t heating during a dry cycle
- The machine won’t power on at all
If your dryer is producing heat but not drying your clothes efficiently, you likely have a lint buildup that’s blocking airflow to the outside exhaust vent. But when the dryer doesn’t produce any heat, the thermal fuse could have blown.
The thermal fuse is a safety feature that protects against overheating, and it often goes out when there’s too much lint in the wrong place. To fix it, you’ll have to crack open the machine and follow a process specific to your dryer model.
You can call a professional service tech to replace the fuse, which might cost $100–$150. If you’re the DIY type, you could try to remove the panel in the back, clean the dryer interior, and replace the fuse yourself.
How Do You Clean the Inside of a Dryer Lint Vent?
When you’re ready to deep clean your dryer vent and ductwork, you’ll make the process faster and more straightforward with a dryer vent cleaner kit. A tool like the Holikme 30’ Dryer Vent Cleaner Kit is a flexible brush that can fit through your duct system to the outside vent.
Check out this video for a breakdown of the dryer vent cleaning process:
Tools and Supplies
- Dryer vent cleaner kit (we recommend Holikme 30’ Dryer Vent Cleaner Kit)
- Drill
- Vacuum cleaner
- Tape (optional)
Step 1: Disconnect the Dryer and Vent Tube
Unplug the dryer before working. If you have a gas dryer, don’t forget to shut off the supply valve. Loosen the flexible vent tube’s circle clamps around the dryer’s exhaust vent and the port to the ductwork leading outside. Set the vent tube aside.
Step 2: Clean the Inside of the Dryer
Use the lint brush to clean the inside of the dryer at the vent tube connection. Vacuum the loosened lint.
Step 3: Remove the Outside Vent Grate
Remove your exterior vent grate to avoid damaging it while you clean. Check the cover to ensure the flap moves freely (if it has one) and the grate is clean and damage-free.
Step 4: Clean the Dryer Duct
Assemble your dryer vent brush to fit the entire length of your ducts. Attach the end to a drill, and insert the brush head into the ducts. Power on the drill to spin the brush, and move it in and out of the vent to remove lint along the entire run.
Note: Always spin the drill in a forward motion. If you drill in reverse, you could unscrew sections of your lint brush and lose them in your dryer vents. To ensure nothing goes wrong, you can also tape off the brush’s connection points.
Step 5: Clean and Reconnect the Flexible Vent Tube
Clean the flexible vent tube with your vent brush. As you work, check for damage that might warrant a replacement. Reconnect the vent tube, plug your machine back in, and give it a test run to blow any remaining loose lint out of the exhaust. Put the exterior vent grate back on, and you’re all done!
How Often Should Dryer Lint Trap Be Cleaned?
Although you should clean off the lint screen after every load, you’ll only need to clean the entire dryer vent system about 2–3 times annually. Make it part of your spring cleaning chores, and monitor your dryer’s performance throughout the year.
Your laundry routine and vent system arrangement will dictate the best cleaning schedule. For instance, longer vents with more elbows will allow lint to settle faster and require more frequent cleaning. The amount of fabric softener you add, the laundry detergents you use, and even the type of fabric in your clothes can affect how lint accumulates. Every cleaning schedule will be unique, and it will be up to you to determine the most sensible routine.
The general rule is to clean your vents at least twice a year. Inspect them whenever you notice your clothes are consistently coming out wet or taking a long time to dry, and clean them as needed.
Why You Should Clean Your Lint Trap and Dryer Vents
Cleaning lint traps is crucial in keeping your home safe and minimizing drying times. As lint piles onto the screen, it prevents proper airflow and stops moisture from escaping. Your machine loses efficiency as it takes longer to dry, costing you time and money.
A clean dryer vent and lint screen eliminate a significant fire hazard from the laundry room. Dryer fires cause hundreds of millions of dollars in damage every year, as it only takes the slightest spark to ignite the chain of stuck-on lint. Cleaning your dryer vent is effortless, and the benefits make it a chore you can’t ignore.
How Do I Stop Lint Buildup In My Dryer Vent?
Frequently cleaning the lint trap and moisture sensors will keep your dryer working efficiently, which will subsequently slow lint buildup in the vents. Clothes produce lint due to friction and air movement loosening fabric fibers. By reducing dry times, you can prevent the wear that causes lint to shed.
Shaking out clothes after they come out of the washing machine will remove tangles that trap moisture and help you get your laundry out of the dryer faster. You can also prevent dust and debris from entering the dryer air intake by sweeping around and under the dryer.
Why Does So Much Lint Get Past the Lint Trap?
No matter how often you clean your lint trap, some lint is bound to slip past. Lint filter pores generally aren’t small enough to catch the tiniest bits of lint. The simple act of removing and reinserting the lint screen will also jostle some fibers loose.
Clothes dryers are improving, but the lint screen still leaves room for improvement. Until manufacturers perfect the filter, it’s on us to launder responsibly. Clean your dryer lint trap after every load, and follow these tips to keep your dryer performing without issue.