
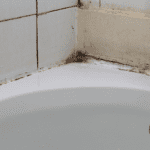
Glass walls, tile, and grout get all the attention when it’s time to deep clean the bathroom, but neglecting the shower caulking will come back to bite you when mildew and black mold stains set in.
Mold is unhealthy for allergy and asthma sufferers and unsightly for anyone, especially on shiny white shower caulk. It will take a little extra elbow grease to restore the look, but aggressive cleaning will wear the caulking out as quickly as it removes mold. You’ll expose interior shower walls and subfloors to excess moisture with a damaged seal, leaving a time-consuming repair job on your hands.
Replacing caulk is unavoidable when a mold infestation becomes too far gone. But with an informed approach, you can often remove mold from shower caulk without worrying about weakening it. If you have moldy caulk already, take the easy way out with these handy cleaning tips to brighten the look of your shower.
How to Remove Mold From Shower Caulking
Mold spores take root quickly in the shower area, given the moist environment and organic matter, such as hair, skin cells, and body oils. Moldy bathroom caulk often occurs when mold grows in the tile and grout behind it, requiring you to remove the caulk and sometimes even the tile to clean it all out.
Before going to those lengths, a less labor-intensive cleaning may take care of the issue if mold growth has roots at the surface. To clean mold from shower caulking without damaging the seal, you can use:
- Bleach
- Baking soda
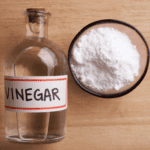
- Distilled white vinegar
- Hydrogen peroxide
Grab a pair of rubber gloves, a spray bottle, a mask, a clean cloth, and an old toothbrush to use with your cleaning solution. Before applying your mold remover, clear away dust, dirt, and debris with a brush.
1. Chlorine Bleach
Because chlorine bleach can be severely hazardous to your health, we don’t often recommend it when there’s a viable alternative available. But with adequate ventilation and protective gear, you can use it as an effective way to remove mold from shower caulk, tile, and other non-porous surfaces.
- Mix bleach and water in a 1:10 ratio in a spray bottle
- Spray the bleach mixture on the mold stains and leave it to rest for 15–30 minutes
- Use a soft-bristle brush to scrub the stain away gently
- Rinse the caulk with a sponge and warm water
The bleach solution may roll off the caulk too quickly. Silicone caulk is generally waterproof, and with beads creating a slope, it’s supposed to let moisture slide off. To overcome the issue, you can try a clinging bleach gel, such as a toilet bowl cleaner, or cotton balls soaked in bleach. Drench some cotton balls or a wad of toilet paper with the bleach solution. Press them firmly against the moldy caulking, and let them sit for an hour or more.
After removing them, use a wet towel to clean the leftover bleach from the caulk, and dry it with a clean cloth. The caulk should be mold-free, but if you still see mold beneath it, you may need to re-caulk the area.
2. Baking Soda Paste
Baking soda’s versatility in the bathroom shower knows no bounds. It’s a safe grout cleaner for sealed and unsealed tile, a metal cleaner for glass sliding door tracks, and a non-toxic solution for cleaning mold from shower caulking. It absorbs excess moisture as it works, and the alkalinity prevents mold from growing.
Create a paste of baking soda and water, making it thick enough to adhere to the caulk for an extended period. Spread it on the caulk, and let it sit for 30 minutes or longer. Use your old toothbrush to scrub the paste into the mold and lift it away. Finish up by washing the area with a wet sponge.
3. White Vinegar
Distilled white vinegar is arguably the best lung-safe product for removing mold around the house. While it isn’t as effective as bleach, it’s a practical cleaning solution when you lack proper ventilation or adequate protective gear.
You can apply the vinegar in a way similar to bleach. Add it undiluted to a spray bottle and spritz the stain, allowing it about 30 minutes or more to take effect. You can also soak toilet paper or cotton balls as an alternative to prevent the cleaner from sliding off the shower caulking.
4. Hydrogen Peroxide
The mild bleaching ability of hydrogen peroxide makes it a practical tool when you need to remove mold from shower caulking and other bathroom surfaces. Add undiluted 3% hydrogen peroxide to a spray bottle and apply it to the stain. Use your soft-bristle brush or a sponge to clean the affected area.
What Is Shower Caulk Made Of?
Silicone caulk is the most common variety for showers. It’s more expensive than acrylic caulk, but the flexibility and waterproof characteristics make it well worth the added investment in the shower. Most mold-resistant caulk options are 100% silicone. It isn’t paintable, but that’s unlikely to be an issue when it’s against a tub and tile.
Siliconized acrylic latex is a hybrid of the two types of caulk, giving you many of the benefits of both. It’s paintable and durable though still not as practical in the bathroom as pure silicone. You can use it if you have nothing else available, but its best applications are for areas with mild moisture exposure, such as sink backsplashes or exterior trim.
What Damages Silicone Caulk?
Various solvents will soften silicone caulk, making them perfect if you need to replace caulk but not as ideal if you just want to remove mold. Many people use acetone and mineral spirits, but isopropyl alcohol or even white vinegar can make a practical caulk remover.
As it does in so many areas around the house, vinegar toes the line between harmful and helpful. The typical distilled vinegar in the kitchen cabinet is safe enough to remove mold growing in the shower, but you don’t want to leave it on the caulk for too long, or it could start to degrade the seal. Avoid using alcohol or acetone in any event, and take special care if you decide to use a vinegar solution.
How Do You Clean Silicone Caulking From a Shower?
If the mold runs deep or is sitting in crevices behind the shower caulking, your only bet is to remove it, clean the mold, and apply a new caulking line. Follow these steps to replace caulking in the shower:
- Run a utility knife along the bottom edge of the caulk where it meets the floor tile and the top edge where it meets the shower wall to separate it
- Use a scraper to lift the old caulk and scrape away as much leftover caulk as possible
- Clean the area with alcohol or vinegar to remove any lingering silicone caulk or soap scum
- Use a soft-bristle brush and bleach (or your preferred cleaner) to kill mold in the joint
- Dry the area with a towel and let it sit until all of the moisture is evaporated
- Apply a new caulk bead to the joint, smoothing it down with a finger dipped in warm water
Keep caulk away from children and pets as you work. Caulk composition has gotten safer over the years, and it’s unlikely that the old or new caulk will cause anything more than mild irritation. But between the potential mess and adverse health effects from ingestion, it’s worth being extra careful.
What Is Pink Mold?
Black mold isn’t the only colorful invader of shower caulk. You may notice pink blotches appear on shower caulking over time, developing in a way similar to mold. Bacteria is to blame for these lighter stains, specifically Serratia marcescens or Aureobasidium pullulans, two common bacteria that thrive in moisture and feed on soap scum, shampoo, and other hygiene products. Though relatively innocuous, they can cause health issues for allergy and asthma sufferers.
Fortunately, you can use the same solutions whether you have black or pink mold. With rubber gloves on, use a soft brush to scrub in bleach, baking soda, or vinegar to make the stains disappear.
How to Prevent Mold Growth in Shower Caulk
Keeping the shower dry and the space well-ventilated is the best way to prevent black mold growth. Use the bathroom fan whenever you take a shower. If you don’t have an exhaust fan, open the window and leave the door cracked to maintain airflow.
Assess caulk frequently in the bathroom to immediately kill visible black mold and mildew before it can spread. Make bathroom deep cleaning part of your weekly or bi-weekly cleaning routine to catch early instances of mold and take away the growing conditions it needs.
Prevent Shower Mold with Professional House Cleaning
Showers demand regular cleaning to save you from expensive mold removal and repairs. But with a hectic work schedule and busy family life, finding the time for any cleaning routine can feel impossible.
When you need a break from the stress of unmanageable cleaning chores, let Anita’s find an expert local house cleaning service to take over. It only takes a few minutes to schedule a customized cleaning visit at a time that works for you. Request a booking today for all of your bathroom cleaning needs and more!